Converting Miniatures with Greenstuff
A while back, I joined a Dungeons and Dragons group. The dragonborn race looked fun, so I decided to try a dragonborn paladin. The image on the right illustrates what a Dragonborn looks like, so you'll know what I was shooting for.
Well, I certainly couldn't game without a miniature, so I headed to my local hobby shop to find a dragonborn miniature. No dice... Actually, they had plenty of dice, of which I brought home a couple dozen, so better said, "No luck."
The only way to get a dragonborn miniature is to buy lots of Dungeons and Dragons miniatures and hope that you get lucky and get one in one of the random packs.
Well, I'm waaaaay too cheap for that, so I decided to create my own. Better said, I decided to cheat, starting with a miniature that looked almost like what I wanted and converting it. I found an undead warrior miniature that I liked, whose armor looked like the scales of a dragon, so I bought it. My mission - to convert a skeletal faced warrior itto a dragonborn paladin.
This was one of my first experiences with converting using a material called Greenstuff, which is used by many professional miniature sculptors. This was my first attempt at sculpting in a few years, so while I was pleased with the finished product, you can probably create something even better with some practice.

I scanned this from the D&D Player's handbook, produced by Wizards of the Coast.
Greenstuff
"Greenstuff" is a two-part epoxy putty, which is sometimes called "two part epoxy putty" or "Blue/Yellow Epoxy Putty."
It comes in a package with a blue and a yellow stick of epoxy putty. You mix them thoroughly by kneading them together to create a putty that's green in color... and thus the name Greenstuff.
The consistency is wonderful to work with. If you keep your tools moist, they don't stick to the putty much, making modeling less challenging.
I spray a little bit of WD-40 lubricant onto a washable surface, and dab my fingers and tools in it to prevent them from sticking to the putty. This worked really well for me.
Note that my Greenstuff's package warns that it's a skin irritant, so you probably want to use latex gloves when working with it, just to be on the safe side.
Greenstuff is a two-part expoxy putty consisting of a blue and a yellow strip that you knead together to make green.
Converting the Undead Miniature to a Dragonborn Paladin
Here's the miniature I selected to begin with. This is an undead warrior called Malek Blackmarrow from the Reaper Warlord line (#14040 if you want to order it yourself).
The sculpting is excellent on this piece, and it had almost no perceptible flash lines from when the mold was separated.
I prepared the miniature as I normal do, scrubbing it with liquid dishwashing soap and a stiff toothbrush. After it dried, I was ready to begin to create my dragonborn.
I mixed up a small ball of Greenstuff. The package indicates that you have about 2 hours or so to work with it once it's mixed up, so you want to have a pretty good idea what you want before you combine the blue and yellow expoy putties.

Step 1: Cleaned Miniature, ready to modify
From Skull to Scaly Head
The first thing I needed to do was to convert a sunken-in skeleton of a head into a dragonborn head which would barely fit inside his helmet.
I rolled two tiny balls of Greenstuff and put them into the eyesockets with a dental pick. I used the pick to create the eyes.
I rolled a larger ball, which became the nose and bottom jaw of the dragonborn. Working with the pick, I sculpted the snout and teeth.
To look more dragonborn, the mini needed feet, so I referred to the 4th Edition Dungeons and Dragons Player's Handbook to get an idea of what a Dragonborn's feet should look like. I sculped these coming out from under the robes of the miniature, with claws curled around the actual base of the miniature.
The miniature needed a shield. I had a number of old shields from previous projects and some bulk miniatures I bought on eBay some years ago. I found one I was pretty happy with, but I wanted to add something to make the miniature look more unique.
In the D&D lore, the Dragonborn were slaves of dragon masters. They overthrew their masters, but many were very bitter even many years after. Anyway, it seemed like adding a dragon tooth to the bottom of the shield would add a nice touch to represent this hatred for dragonkind.
I attached a piece of Greenstuff to the back and bottom of the shield. A small wad of it attached the shield to the miniature's outstretched hand. Stretching the Greenstuff down with my fingers, I shaped the dragon tooth, finishing it with the dental pick to crispen up the edges where the tooth attached to the shield.
Note that Greenstuff comes with a warning that the epoxy putty is a skin irritant. You want to use a pair of thin latex gloves to protect your hands.
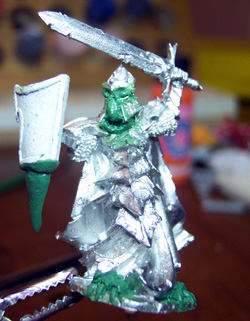
Step 2: Adding Greenstuff details to convert from an undead skeleton to a Dragonborn miniature.
Note: Starting with a skeleton figure works well if you want to change the face, because you can build up over the skull.
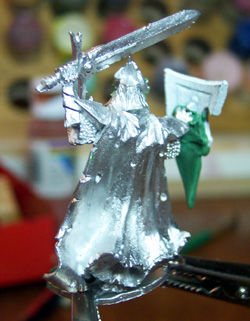
The backside of the miniature, after details sculpted.
Painting the Miniature
I began by priming the miniature with a can of Krylon flat white spray primer paint (the kind you find at the hardware store). It cost just under $3 at Walmart.
You'll probably notice that most of my materials I buy on the cheap at hardware and craft stores, rather than lightening my wallet buying tiny bottles of paint with miniature manufacturer's names on them. If you can afford more expensive paints, you may be happier with the results.
However, as long as I prime my miniatures and blackwash and drybrush them, I haven't had problems with coverage even with plain old craft paint like you find at Hobby Lobby, Michael's, or Jo-Ann Fabrics. I use primariliy Ceramcoat paints, which has excellent coverage. In testing I have done, it performs silimarly to paints produced by miniatures companies such as Reaper, Games Workshop, and Vallejo.
I have also used brands such as Apple Barrel, Folk Art, and a few other lines of paint, but I don't find that they have as good of coverage as Ceramcoat, so I mostly use these cheaper paints for large areas that I need to cover, such as when I'm creating dioramas. My red may be named "barn door" instead of "gore red," but they seem to work well, at a fraction of the cost. Your results may vary.
Note that the one exception when I often use paints produced by miniatures paint companies is with some metallics. Craft paints, especially the cheaper ones, tend to have metallic particles which are not as fine, and which don't cover as well with thin layers.
For inking and washes, I use Pelikan inks, which cost about a third of what "miniature" inks cost.
Blackwashing
I primed the miniature with white spray primer. Afterwards, I blackwashed the miniature with a very thin mixture of black paint. Add water to black acrylic paint at a ratio of about 1:5 parts paint to water. The mixture should flow about as freely as milk cream would, if that helps.
If your paint is thicker or thinner than what I use, you may want to adjust this ratio accordingly. You'll know you have the consistency right when the wash settles into the cracks without easily running off the miniature.
This ensures that the shadows and folds are sufficiently dark. Blackwashing and other washing techniques darken the areas where an overhead light souce would illuminate least (shadows).
Because wash contains mostly water, it takes longer to dry than undiluted paint would. Make sure the wash has completely dried before going on to the next step.
However, you may be thinking, "That's great, but how do I get the highlights bright enough over a dark base coat?"
That's the reason for the next step in the process... drybrushing.
Applying blackwash primes shadows darker than highlight areas.
Drybrushing over Blackwash
The technique of drybrushing involves painting just the highlights of a miniature, the areas an overhead light source would light up most brightly.
Typically when you drybrush, you use a lighter color than the main color of an object. Load your brush with this lighter color. Lay a paper towel flat and draw your brush backwards towards you. Turn the brush over and do this again.
Continue to remove paint from your brush in this way until you don't see much paint coming off on the paper towel. Now your brush is ready.
Start from the top of the miniature, lightly draw your brush downwards, applying very litte pressure inwards toward the miniature. If done right, you'll just apply paint to the highlight areas, as shown in the image to the right.
Let the paint dry before continuing to the next step.

Applying drybrush primes highlights lighter than shadowed areas.
I painted the main areas of the miniature in primarily a complementary color scheme. I used colors found across from one another on the color wheel, green and a metallic reddish color.
Colors close to one another on the color wheel go together nicely, but lack the contrast of those which lie farther away.
At least a basic understanding of the color wheel as it applies to mixing colors is something you should strive to understand.
Knowing which colors you mix to get other colors is essential to being able to use a full range of colors with a minimum investment in the number of paints you need to buy.
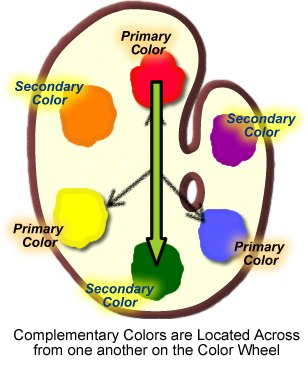
Complimentary colors increase contrast.
Washing
On this miniature, I didn't drybrush the main colors, but I did use a wash over some of the areas.
You can use a wash consisting of water and acrylic paint for fairly small areas. However, when you have a larger area like the cape, you won't get a smoothly blended transition this way.
With larger areas, I mix acrylic paint with extender, a drying retardant used in blending colors. The extender thins the paint, making it not only flow better, but also making it less opaque, the same as when creating a wash with water.
However, the real difference you get when using extender is that the extender flows more like a thick cream. This makes the transition smoother.
I've also found that the extender can act much as a sealer often does, making the colors richer.
Applying a Scanned Design
I wanted to enhance the look of the miniature as a holy fighter (paladin). I scanned the design symbolizing this character's deity from the Dungeons and Dragons Forgotten Realms Player's Guide.
I shrank the image way down to fit the size of the miniature's cloak. I cut it out with very sharp scissors and sprayed the back with 3M 77 Spray Adhesive.
Then, I applied the little decal I had created, working from one side, pressing it into the folds as I worked towards the opposite side. If you try to attach this kind of decal without working from one side to the other, it can rip.
Note that this kind of spray adhesive is not a very strong adhesive. It just holds the decal in place. I used several coats of sealer to act as glue and to basically laminate the decal, protecting the paper out of which it's made.

A printed rose design is applied to the cloak.
Next Steps
The image on the right shows how the miniature turned out so far. I want to put a coat of arms or other design on the shield and I have some inking to do to bring out the helmet designs and to increase the contrast of the highlights and shadows of the chainmail bits.
The paint job has a long way to go before it will be finished. However, since the objective of this article was to explore how to use Greenstuff epoxy modeling putty, I think the miniature serves its purpose.
If you have any questions, you can contact me at seomarketer@gmail.com to discuss the techniques used with this miniature.
Have a great day, and keep honing your miniature painting skills.
-Cajur
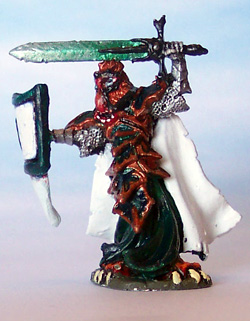
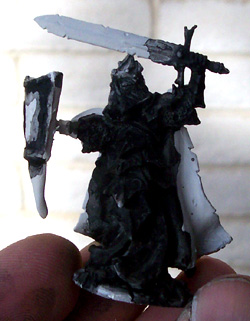
The completed miniature, before painting was completed.
worth a few dollars/Pounds/Euros?
I don't sell anything on this site, and I provide all information free of charge, so if this site has helped you, please consider donating to help support adding more content to this site. Just click on the Tip Jar image above.
If everyone pitches in just a few dollars/Pounds/Euros, I can add videos and more tutorials to serve you even better.