Blending Paint
Blending creates smooth transitions between two (or more) colors.
Drybrushing, washing, and other effects work well to create abrubt transitions which bring out detail and draw attention to areas of highlight and shadow. Where I found they began to limit me was when I covered larger areas of a miniature. Here's where your mastery of blending techniques will set your miniatures apart from the crowd.
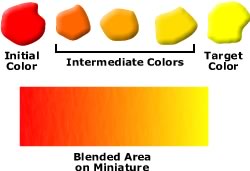
Blending Starts with one color and gradually progresses towards a second color.
The Perils of Poor Blending
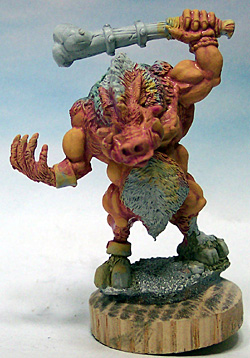
The miniature to the right shows what happens with a badly-applied blend. Transitions within the skintone occur too abruptly.
This gives the miniature the appearance of being dirty or muddy when we do not apply washes in gradual color gradation steps.
Likewise if we drybrush highlighlights with a color which is too far distant from the base color, it looks unnatural. In this case, we often get a chalky look to the surface, since paint used in the drybrush process is, as the name suggests, dry. Dry paint seldom yields smooth transitions from one color to another.
For this reason, I use wet blending almost exclusively now. I painted the miniature to the right over 10 years ago, before I discovered wet blending. You can tell I wasn't happy with the results because I never finished painting the miniature.
Read on, and I'll show you how to avoid this in your own miniatures.
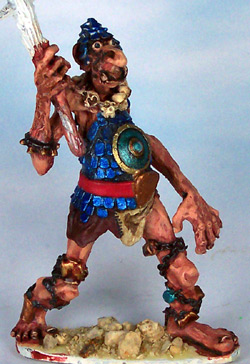
Apply smooth transitions to avoid the muddy look of this miniature's skin. Yes, when I started out, my blending wasn't so great. It's time to repaint this mini, I think.
Wet Palette Paint Mixing
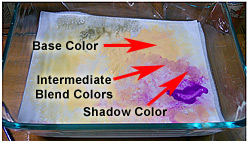
To the right you can see the color range I used for the basecoat through the shadow color, which is an earthy violet.
If you're not familiar with the type of palette shown, you're not alone. I recently switched from a traditional plastic artist's palette to this one. Called a "wet palette," it keeps your colors workable for hours or days without drying.
My wet palette consists of a Pyrex dish which came with a lid. I place two layers of felt at the bottom of the dish and fill the dish with water until the water is at or just below the level of the felt, which soaks up the water. I obtained the felt at Walmart, but any fabric or hobby store should stock it. I use white felt so that the palette colors stay true.
Onto the soaked felt, I place a piece of printer paper, which becomes damp. Put your paints onto the wet palette and mix them like you would with any other palette.
The wet paper keeps the paints from drying out, especially useful when you work with desktop lamps which put out heat. I always hated playing beat the clock as I tried to apply acrylic paint before it dried on the palette.
The wet palette also makes it very easy to dilute paint for the kinds of thin washes that I use in the blending process. Just pick up some paint on your brush and spread it around on a wet, clean portion of the palette. It mixes with the water, diluting it. The larger area you spread the paint over, the more diluted it becomes.
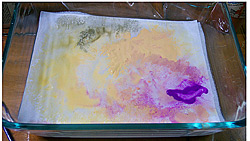
Above you see my "wet palette," which keeps paints from drying out. This is especially helpful when you're blending over a range of colors and need more time to work with them than a normal dry palette provides.
Apply Multiple Layers of Thinned Paint
To Achieve Smooth Blends
I have completely reworked my technique for blending. I found that the process I used caused me to lose too many details and did not lend itself well to smooth transitions.
The first thing I had been doing wrong was that I was applying the color basecoat too thickly. I attempted to apply a color basecoat in a single application with undiluted paint. As a result, paint accumulated during this stage in cracks and depressions, which caused a loss of fine detail.
My new method begins with applying paint in multiple layers, diluted to between 8:1 and 10:1 water to paint. This thin paint will not cover in a single coat. On average, it takes 3-5 coats to apply the base coat, but the advantage is that you keep the fine details.
A second advantage is that the paint remains much more matte. When you apply undiluted acrylic paint, it can dry with a plastic look, with a small amount of shine. Unless your subject should have some shine to it, the flat, unreflective look gives a MUCH more realistic look.
Note how in the picture to the right, the first coat does not give full coverage as a base coat. After taking this picture, I went on to apply another two base coats to achieve full opacity.
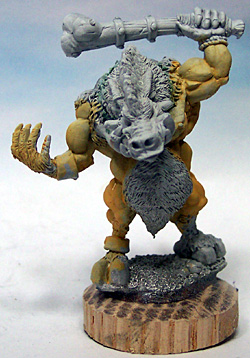
When covering a miniature with diluted paint, you won't achieve full coverage on the first pass. It takes 2-5 layers to get a completely opaque color, but you'll preserve details you'd otherwise lose.
Creating a Smooth Blend
Once you have a fully opaque base coat, the next step in blending is to apply a number of thin washes of paint, each of which approaches the target color.
The illustration on the right shows the colors I will blend to create the transition from the violet shadows to the base skin color.
Once I switched from a plastic dry palette to a wet palette, there was no going back for me. No more playing "beat the clock" with paint drying on my palette. I can go back even a week later and continue working with a color I mixed earlier. I LOVE it!
First Blend Step
I apply t he first wash with a mixture of between 8:1 and 10:1 water to paint dilution. I use this consistency for all base coat and blend steps.
Notice how the first coat covers large areas of the skin, leaving only areas in the strongest light unwashed.
Take special care to work from layer to layer, each time approaching a little closer to the final shadow color.
With each application, you will apply the wash to a smaller and smaller area until you get to your shadow color. The area of application shrinks with each successive wash. The final shadow color will only cover the deepest recesses of the painted area.
This gradual blending process avoids rings of color appearing on the miniature. These rings appear if we apply washes which differ too much from the previous wash color applied. Here's how it works.
Apply the first layer of wash using a color which does not deviate much from the base color.
Avoiding Wash "Rings"
As paint dries, the edges of a painted area dry first. As they dry, they pull paint from the center of the little puddle applied.
Because the edges keep pulling paint from the center as they dry, more and more pigment draws to the edges, where it dries. This leaves a ring of paint, where the edges are darker than the center of the area where we applied paint.
We can avoid rings in the following ways:
- Apply less Paint to the Brush: The shallower the puddle of paint, the less there is to draw to the edges as it dries.
- Use a Wash Mixture which varies very little from the previous wash: This way, if a ring forms, its color is close enough to the previous color that the ring is much less noticable.
- Apply Diluted Paint: With less pigment in the paint puddle, less can accumulate at the edges to form a ring.
Once you have mastered the process of wet blending, you will be ready for advanced techniques like Non Metalic Metal (NMM), which you won't be able to master without it.

The final result is a smooth transition between the basecoat color and the shadow color. Sadly, my photography skills don't do this miniature credit.
worth a few dollars/Pounds/Euros?
I don't sell anything on this site, and I provide all information free of charge, so if this site has helped you, please consider donating to help support adding more content to this site. Just click on the Tip Jar image above.
If everyone pitches in just a few dollars/Pounds/Euros, I can add videos and more tutorials to serve you even better.