Glossary of Painting Miniature Terms
Click one of the links below for a description of the miniature term in the glossary.25mm
- Miniatures referred to as 25mm or 28mm are making reference to the size of the miniature, namely the measurement of the height of a typical man rendered in that scale. So, a miniature of a typical man in 25mm scale would be 25mm high. Typical scales in wargame miniatures are 15mm, 25mm, and 28mm.
![]()
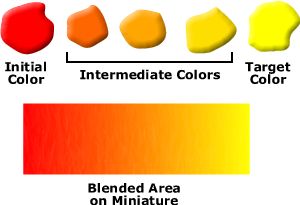
Blending
- Blending is the technique of fading from an initial color to a target color. In-between colors are mixed and applied to make a smooth transition from the initial color to the target color.
Learn More About Blending
![]()
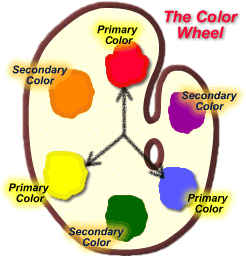
Color Wheel - The color wheel is a representation of the colors in the visible spectrum of light. The color wheel is made up of three basic "primary colors", which are red, yellow, and blue. From these three colors, all colors can be mixed which are obtainable from the subtractive color scheme of which painting with pigments are a part. When these colors are mixed together in equal proportions, we get the "secondary colors", which are orange, green, and violet (purple). Mixing equal amounts of a secondary color with a primary color gives us the "tertiary colors", which are red-orange, yellow-orange, yellow-green, blue-green, blue-violet, and red-violet. Some illustrations of the color wheel include the tertiary colors and some do not. There are an infinite range of colors which can be mixed with the three primary colors. You may wish to make a color wheel of your own, mixing your primary colors and applying them to a white poster board so that you can visually get some idea of the colors available to you and how to mix them. This can be an invaluable guide in the planning stage where you decide on a color scheme for a miniature. It will also help you to be able to mix a color that you have created later when you want to do touchups and so on.
![]()
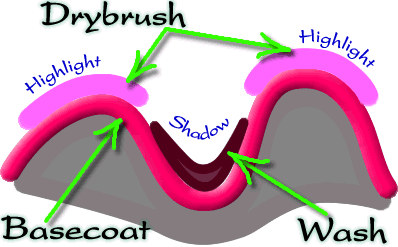
Drybrushing - Drybrushing is the painting technique of applying paint to a brush and then removing most of the paint on a cloth or paper towel and then stroking across the raised areas of a miniature. Because little paint is loaded on the brush, the paint is only deposited on the raised areas of the miniature, which simulates the highlights on an object caused by the light around the object. Normally one would apply drybrush highlights with a lighter color than the one which we are highlighting. Brush strokes should be done in a top-down method, so that the majority of the paint will end up on the surfaces which would receive the most light in the physical world. Holding the miniature directly beneath a bright incandescent (bulb, rather than florescent) light source will give you some idea of how light will fall on the miniature.
![]()
Ferrule - The ferrule of a paint brush is the metal part which holds the hairs of the paint brush in. The hairs of the brush are often held in place with glue, which melts when hot tap water is applied to it. For this reason, it is important to only clean brushes in cold or warm water when using acrylic paints.
![]()
Flash/Flashing - Flash is the line left on a miniature by the casting process where the pieces of the mold come together. Flash can normally be removed with an Xacto™ knife by scraping along the flash line. For some miniatures made of harder pewters, it may be necessary to clean flash with a needle file (sometimes called "jeweler's files"). As a word of warning, Xacto knives are razor sharp and one slip can gouge your hand badly, so where possible, scrape in a way that if you slip, you will avoid injury.
![]()
Highlighting - Highlighting is applying paint typically to raised areas of a miniature to give a similar effect to that of drybrushing. The advantage of highlighting over drybrushing is that you can put the paint on thicker than with drybrushing, so that not so many coats of drybrushing need be applied. Also, you gain more control over where the paint goes, so this is good for adding highlights to areas which are hard to get at, where drybrushing would risk applying paint to areas which were not desired to be painted. In highlighting, you typically would paint along the contours of the miniature, where with drybrushing you normally paint across the contours.
![]()
Lead-based - Lead-based miniatures are those made from lead or alloys containing lead. Special care must be taken when handling and storing lead-based miniatures because of the associative health risks, especially for children. When filing miniatures or anytime when lead bits of the miniature may come loose on a miniature, such as when scraping mold lines from the miniature in preparing it, all lead material must be removed from your work area. Wash your hands after working with lead-based miniatures before eating, so that you do not ingest any lead. When storing your miniatures which contain lead, be sure that they are out of reach of children, so that they do not chew on them or otherwise ingest them. Lead-based miniatures tend to be more fragile than their non-lead-based, or "pewter"
equivalents.
![]()
Medium - The materials that an artist works in. For most miniature painting, our medium is acrylic paint on a primed miniature.
![]()
Palette - A palette is a mixing area for your paints. These are usually made of plastic, glass, or ceramic. I recommend the plastic ones with small concave areas for mixing inks. For mixing paints, I sometimes use a piece of showerboard, a thin panel made of wood fibers and coated with a white plastic-like coating. The advantage to using this type of palette is that you have a lot of area in which to mix colors. You also are not limited in the number of colors that you use to the number of small concave areas of other types of palettes. You can place paint anywhere on the board, and cleanup is as simple as using a palette knife or even your fingernail to remove the paint once it dries on. I actually do all of my work on a piece of showerboard, so that if water or ink spills in the process of painting a miniature, it does not soak into my wood desk that I work on.
I have moved to painting almost exclusively using a wet palette, which has the advantage of keeping paint on the palette from drying for days or even weeks, compared to a usual "dry" palette, where paint can dry in minutes, which can often waste paint.
Learn More About Wet Palettes and Wet Blending Techniques ![]()
Pewter - When used to describe miniatures, pewter refers to a metal substance which the miniature is made of which typically does not include lead. The term pewter in the normal world often refers to a metal alloy which includes silver. Typically the "pewter" substance used in miniatures contains no silver.
![]()
Resin - Resin refers to any one of many different types of synthetic material that is like a hard plastic. Resin often is sold in two parts, one of which is a hardener. Epoxy is a type of resin. Miniatures made from resin tend to have sharp detail, but are somewhat brittle, especially for narrow parts where breakage is more likely. Casting in resin can release harmful fumes, so if you are trying your hand at casting, keep this in mind.
![]()
Subtractive Color Scheme - A subtractive color scheme is one in which the color that our eyes see is not generated by the object, but reflected off the object. Paint is one example of a subtractive color scheme. A computer monitor is an example of an additive color scheme, since the color emitted from the monitor is not reflected, but is actually generated by the picture tube of the monitor. There are colors which belong to the additive color scheme that cannot accurately be represented by painting, which is a subtractive color scheme. In a subtractive color scheme, the reflected light that we see is the light that bounces off, or is reflected from the object. The other colors in the visible spectrum are absorbed by the object, so that those colors are not seen.
![]()
Washing - Washing a miniature consists of applying thinned paint or ink to a miniature. The ink will tend to settle in the cracks of the miniature, simulating how shadows fall on physical objects in the real world. I tend to use non-pigmented inks, rather than the ones which are typically sold in stores which sell miniatures. Pigmented inks often can create a "muddy" or dirty effect and can sometimes leave little rings around the shadowed area in which the ink settles due to surface tension of the ink. If you really prefer the pigmented inks, you can add a small amount of liquid dish soap to the ink to prevent this. Non-pigmented inks give higher contrast. You can essentially create pigmented inks from non-pigmented ones by adding white ink to it, though it will lighten the ink color somewhat. A fine white ink is sold by Pelican™ ink, which is the brand that I typically use. The use of pigmented vs. non-pigmented inks is a personal matter, and the inks that I use are simply typical of my own style.
![]()