Miniature Sculpting Tools - Home Made
Griffon Guides was doing a "Sculpt-a-long" class, where Cybersquid was teaching how to sculpt miniatures. He provided a comprehensive list of tools and materials.
One of these, in fact the one that he said that he absolutely wouldn't try to sculpt without, are clay shapers, or "rubber brushes." I respect his advice, so I headed down to the local Hobby Lobby to find some. No dice. They had about every other type of sculpting tool, but not these.
I found something there called a "paint eraser," which looked similar to the tools that Cybersquid described, but nothing looked quite right.
Sticker Shock
After my failed trip to Hobby Lobby, I looked for these tools online. The tools I found online ranged from $25 to $35. A set of tips for one set were $25, all by themselves. Now I don't mind paying for miniatures supplies, but this seemed ridiculously expensive to me. Besides, I wanted to get started right away, and didn't want to wait for the tools to arrive in the mail.
Then it hit me. We're going to be sculpting. The tips for the tools are flexible rubber, somewhat similar to the Green Stuff we'll be working with. Ah-ha!
Featured Product - Greenstuff
Comfortable Handles
Now all I needed were some tools with comfy handles and I figured I'd sculpt the tips myself, being the "crafty" guy I am.
In the Featured Product panel, you can see the tools that I chose as a starting point. These are scribers for doing stenciling.
They have comfortable rubbery grips. The metal tips seemed like they'd be a perfect base over which to sculpt the tips.
Featured Product - Sculpting Tools
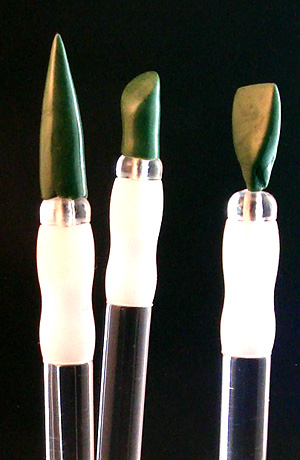
Sculpting the Tips
I mixed up some Green Stuff and I sculpted the tips, as shown to the right.
To get the tips smooth, I squirted a little WD-40 into a glass dish, with which to keep my fingers from sticking to the Green Stuff expoxy putty. It worked like a charm.
The only real difference I can see between my home made tools and the actual rubber ones is that the long, conical tipped tool that I created doesn't spring back as fast as rubber might.
For the initial sculpting I have done so far, converting an undead warrior into a warforged for my son, the tools work great! These have become my sculpting tools of choice, beating out the metal sculpting tool set upon which I normally rely.
The Green Stuff tips are flexible, about the same as a medium stiffness rubber, I'd estimate. While they don't spring back as quickly as rubber would, there are times when I have enjoyed this property of my scratchbuilt tools, since the tip stayed more or less in the same spot I was working, and I didn't feel like I was fighting the tools as much I might have with rubber tips.
The "paint erasers" I picked up for $5 at Hobby Lobby seem very similar to the clay shapers that Cybersquig described. I'll try those as well, and I'll try to remember to update this page later to let you know which work best for me.
Happy sculpting, all!
Next Topic: Converting a Skeleton Miniature into a Dragonborn >>
Comfortable handles make sculpting much more pleasant.
worth a few dollars/Pounds/Euros?
I don't sell anything on this site, and I provide all information free of charge, so if this site has helped you, please consider donating to help support adding more content to this site. Just click on the Tip Jar image above.
If everyone pitches in just a few dollars/Pounds/Euros, I can add videos and more tutorials to serve you even better.