Washing Miniatures
Washing is a technique that involves highlighting shadows by allowing a thin mixture of color that is darker than our base color to flow into the cracks, creases, and crevices of the figure.
When brushed over the entire area, the color will flow off of the higher surfaces and stay in the cracks.
Make Wash Flow Evenly to Avoid Rings
The surface tension of the dilluted paint can cause diluted paint washes to dry unevenly, leaving rings of paint or splotchiness.
It's like when you wash and wax your car. Water beads into droplets. As it dries, if there is any dirt in the water, it leaves small rings when it dries. Diluted paint acts the same way.
To break up the surface tension, simply add a drop or two of dish soap into your brush washing container and use this to water down your paint used for washes.

To bring out the details of this miniature, a wash was applied to enhance the shadows and crevices.
Prime miniatures with white to achieve the best contrast between light and dark colors.
Softer Contrast Washes
The other way to prevent rings when washing that I use is to add acrylic floor wax to the wash. This not only breaks the surface tension, but it thickens the wash, which blends between the washed areas, resulting in less stark contrast between the deepest highlights and the base color. This gives a more natural effect. The thicker wash is also easier to control than thinned paint or ink, which can flow everywhere if you're not careful.
Another benefit is that ink can be extremely saturated. Adding Pledge Floor Finish makes the ink less intense, allowing for thin, easily controlled layers that blen well.
Many suggest using Winsor & Newton Galeria Acrylic Matt Medium instead of Pledge Floor Finish
. I have had great luck with this acrylic medium
. One upside is that it has less shine and is thicker, so it is even easier to control the flow of the wash.
How to Create Realistic Shadows with Wash
If using paint, you will mix some of the base color with a bit of a darker color, making a shadow version of the original.
Some use straight black for this, but a darker version of your base color will give a more natural look. Other than coal and a few other exceptions, black does not itself exist in nature. Instead, you will find that most things that you see in the natural world are dark blues, browns, or what have you. These colors may approach pure black, but seldom completely lack any color.
When you get a dark color that you are happy with, add some water to the paint by dipping your brush into your rinse container and mixing it with the paint. The consistency that you are after is that of milk. It should flow well and be fairly watery and transparent.
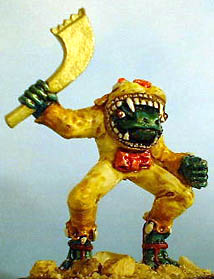
This Slaan figure's leather skin outfit is coated with a thin brown wash.
Technique for Applying Wash
Drag your brush loaded with the watery paint ACROSS the grain of whatever you are washing. In other words, you do not want to drag the brush down, say the length of a fold in a cloak, but rather drag it across the folds.
This deposits the wash only in the cracks and depressions. If you got uneven amounts of wash, you can put a bit more wash in these areas before it dries, but you'll have more control over you washes if you use a few layers, rather than applying a heavy wash with a fully loaded brush. If you have too much wash on your brush, it's hard to control, and will tend to end up in places you don't want it.
Painter's Secret: Wet a brush and "paint" water over the areas you want to wash. Then apply the wash in smaller, less diluted quanties. The wash will flow over the wet areas easily. With some practice, you can use this technique to wash just the areas you want. If you get water where you don't want it, you're not going to ruin the nearby painted areas. Just let it dry. Then re-paint the area with water. When only the portion of the miniature you want to wash is damp, apply wash.
Control the Flow of Wash with Gravity
It is important to consider how the figure is positioned when applying a wash. Gravity pulls the wash to the lowest point, so you would not want to, for example, stand a figure upright and then wash his cloak unless you want much darker wash near the bottom where it will flow to. Let the figure set in the desired position until the wash is dry enough not to flow. You can then go on to another section of the figure.
You cannot wash an entire figure at once due to the way that the wash will flow. Instead do it in sections, even if all that you are washing is the same color. You'll find that you have far more control over how the wash is applied.
Do this for each area, noting the highlights that will really make the details of the piece stand out. It is amazing how good of detail that you can get out of washing in a minimum of time.
Washing With Inks
Use the same basic techniques for ink washes that you do with paint washes. Where you'll see differences is in the way inks tend to be more intense than washes of watery acrylics. You'll tend to get better contrast with inks, especially with unpigmented inks.
You will only have to water down your ink about 1:1 with water to get the flow that you want, depending on the type of ink used. You can mix inks just like you mix paint.
Inks can prove tricky sometimes, but with some practice you may find that you're much more pleased than with using paints for your washes. Myself, I tend to wash with either paint or a mixture of paint with a little ink mixed in.
I use inks to bring out very sharp detail, especially when applying washes.
Unpigmented inks (like the india inks on the right) give starker contrast, whereas pigmented inks usually result in more subtle shadows.
India inks work great for this, and the product link to the right is a great deal on a dozen colors of ink!
So, should you use pigmented or unpigmented inks? The answer, as is so often the case is, "It depends."
Pigmented InksUnpigmented inks are the best at creating stark lines, and sometimes that's exactly what you want. If you want to make the seams on a tank stand out like they were drawn on, unpigmented inks are perfect
However, the challenge with unpigmented inks is that they stain the paint below more than pigmented inks, which apply some translucent covering like paint would. One of the challenges with unpigmented inks is that if you paint directly over ink-stained paint, if you don't seal the stained paint, the ink will bleed through to the layer of paint that you put over it.
For that reason, if you're going to use unpigmented inks and you're going to paint over stained areas, in most cases, you'll want to apply a light coat of sealer or varnish over the layer below.
For highlighting the face on a miniature, pigmented inks like the excellent ones by Army Painter will typically be your best choice. They blend better, and you won't have the same issues with bleeding that you can experience with india inks and similar products. For eleven bottles of pigmented inks, this is an extremely good value, but certainly you should choose what works best for you.
Wash or Glaze?
You may hear the term "glaze" used. The only difference between a wash and a glaze is in the way you apply them. Either may be applied in various consistencies.
With a wash, you intend to let it accumulate in the recesses and low areas of a miniature. You apply a wash evenly in a thin application, preventing it from accumulating in one area more than another.
Use a wash when you want to uniformly change color across an area of your miniature. Maybe you are painting a purple cloak that you want to darken overall. Apply a thin wash evenly across the area with a darker color.
One caution, however. Realize that when you apply a semi-opaque wash to a miniature, you will reduce the contrast across the area where you apply it. You can use this to your advantage to even out blending. If you have applied drybrushing or other highlighting techniques, you may find that you need to re-apply the highlighting after applying a wash.
Pigmented or Unpigmented Inks Revisited
Non-Pigmented Inks
A possible exception to washes reducing contrast is when you use a non-pigmented ink. These inks are transparent, where unpigmented inks are semi-opaque. Non-pigmented inks color the area to which you apply them with minimal reduction in contrast.
Non-pigmented inks tend to flow more easily than pigmented inks, as they are much thinner in consistency. They flow well into cracks and crevices, increasing contrast in those areas. However, they are not a good choice for applying to larger areas, as they can be very difficult to control due to how easily they flow, In the past, I have used Pelican brand unpigmented ink with good results.
Pigmented Inks
Pigmented inks provide smoother transitions than non-pigmented inks. I find this useful when blending. These are the inks most often used in painting miniatures. Most inks sold by miniature paint companies are pigmented inks. When they do sell non-pigmented inks, they may label them a "glaze" rather than an ink.
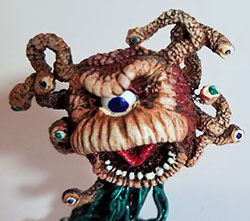
The details on this beholder/eye tyrant were so fine that without washing, it would have been very difficult to highlight them without washing.
Applying Wash to Faces and Flesh
A special case is the face. I recommend using a mixture of red and brown to wash with for the face. Brown alone will make it dirty looking. Incidentally, use more red than brown, about 2:1 to 3:1. It doesn't take much dark color to really make things lose their intensity quickly.
Technique for Higher Contrast Washes
If you find that you get a 'dirty' look to the piece that you are working on when you wash it, particularly with lighter colors, you might try the following. Wet your brush with straight water and brush this onto the area that you want to wash.
This will tend to saturate the dried acrylic paint that you have already put down with water. When you apply the ink now, it does not saturate the paint with ink as much, which stains the original paint and makes it darker and 'dirty' looking. The ink will tend to run off without changing the underlying paint much. You will get more striking contrast and will not have to drybrush over the muddied area so much afterwards. Some staining occurs anyway, which is why when washing, you start with a slightly lighter color than you want to end up with.
Patience... How Long Will THAT Take?
You'll get better at washing with time and practice, so don't get discouraged if you don't get the effect that you want the first time.
Next Topic: Drybrushing Techniques that Improve Contrast Between Light and Shadow >>
worth a few dollars/Pounds/Euros?
I don't sell anything on this site, and I provide all information free of charge, so if this site has helped you, please consider donating to help support adding more content to this site. Just click on the Tip Jar image above.
If everyone pitches in just a few dollars/Pounds/Euros, I can add videos and more tutorials to serve you even better.