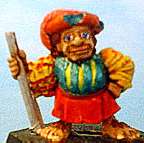
Painting Faces on Miniatures
Exposed flesh areas of a figure are perhaps the toughest to do well, especially the face.
The first step is to paint the face with your flesh color. If you do not have one that you have purchased, you can mix brown, yellow, white, and red to get a flesh tone, but it's really difficult to get accurate skin tones.
I prefer to buy it premixed. That way, if I have to go back and touch up an area, I have the same exact color.
Anytime you mix three or more colors together, the likelihood of duplicating your custom color is not good.
Flesh is used enough to merit buying premixed flesh color. For darker skin tones, medium brown works fine, perhaps with a little blue added in (very little). You can try adding a bit of red as well, but if you add red, don't add blue.
I prefer to have a face come out a bit tanned, rather than ghoulishly light.
Different Races, Different Skin Color
If you are painting orientals, use not as much red in mixing it and more brown. For nordic races, add more white and a touch more red. For american indians, use more brown and more red.
In general, the "flesh" tones that you get will be too light for most caucasions if used right out of the bottle. Many miniature painters complain about this fact. I don't have a problem with it, since I like to wash the face to emphasise the shadows.
Drybrushing Faces
The face is very difficult to drybrush without getting paint on the surrounding surfaces. For this reason I almost think that it is better to paint the high points of the face without drybrushing. If you have the skill to do it, or do the face before anything else, this might be another solution. I find it just as easy to paint the high regions with a small size 0 or smaller brush. The size is not as important as the point that is on the brush and the smaller the brush the more important that this is.
You can get a drybrush look with your small round brush by loading the brush with paint and then take the excess paint off with a paper towel and then drybrush each feature individually. It works well to get a good healthy glow to mix pearlescent white with your highlight color, rather than white. It will give a nice glow to the skin.
Applying Wash to Caucasian Flesh
The best wash that I have come up with for this is a mixture of red and brown, preferrably ink. Ink really excells here, where paint tends to muddy up the face. Ink will stain the face very slightly, making up for the lightness of most flesh colors, but most of the ink will sink down into the cracks and crevices and stay there, provided that you keep the figure oriented such that gravity will hold the ink in the depressions in the face.
To be honest though, I use premixed colors for skin tones, especially for caucasian fleshtones. I find it hard to get a really good color, and even harder to mix it up consistently the same color, so if you're painting several miniatures that you want to have a similar skin tone (such as when painting an army), I'd HIGHLY recommend using a premixed skin tone, like the featured product shown. It will make your life a lot easier.
Eyes
When you get the main part of the face done, the next part is to do the eyes.
Use your smallest brush with the best tip and load the very tip of the brush with white paint. Paint the whites of the eyes as small almond shapes. It is important not to get the eyes too big or you will get a cartoonish look.
I prefer to make the whites of the eyes slightly offwhite, which is truer to life anyway.
The colored circles of the eyes, the iris, can be done in blue, green, brown, or black. Make the iris extend the entire width of the white of the eye, the top and bottom of the circle not quite touching the edge of the white of the eye. If the iris is too small, the figure will look like he/she is shocked or amazed.
Put a small dot of black in the middle of the iris to represent the pupil and a smaller white dot above and to the right or left of the black dot. Be sure that for both eyes, the white dot is at the same angle above and to one side from the black dot. This white dot represents light reflecting off the eye.
If you have an incredibly steady hand or if the eyes are particularly large on the miniature that you are working on, you can paint small lines radiating out from the pupil (black dot) towards the edges of the iris to represent the lined pattern on the iris of a person's eyes.

Painting eyes, step-by-step.
Eyebrows
Eyebrows are best not done unless you are painting a bald character. In that case, just make a thin line, which is best done with a fine tipped marker if the hair is black. Otherwise just paint curved lines above the eyes one eyeball width above the white of the eye and not more than two widths.
Eyebrows are a bit of a pain to get right, so if possible, avoid them altogether. You can mess up an otherwise good face job too easily, and since you are using a color much darker than the flesh tone, covering up your mistake can be difficult.
Painter's Tip: If you do end up with paint in areas that you don't want it, the easiest way to remove if the paint is still wet is to wet a clean brush and to use the brush to clean away the paint. You may have to clean out the brush and dampen it again a few times before all of the color is gone.
Lips
The lips are done in reddish brown for caucasian skin color, the bottom lip being more red than the top lip.
Teeth
Teeth generally do not need to be done at all. They are usually not seen and just too small to bother with.
If you are painting a monster with exposed teeth, paint them a creamy or offwhite color. Antique white or ivory works well if you have the color. Otherwise just mix white with a bit of yellow to get the color with perhaps a bit of brown.
For that cheesy fresh kill look, you can paint "blood" on the teeth. Among most painters, this would be considered a bit much, if not corny. The same goes for blood on the blades of your figures. If you want a really savage look it can be good, but should be avoided as a general practice.
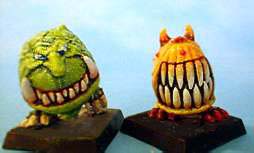
For these cave squigs, the teeth were a prominent feature, so getting them right was important.
Flesh
Hands, arms, exposed chests, and legs, basically all exposed flesh is treated about the same way. The basic flesh tone is painted on, taking special care to make sure that the coverage is sufficiently opaque.
Once this dries, mix up some red-brown wash similar to the one used for the face. In fact, it is a good idea to paint all flesh and then wash and drybrush all at once to keep the colors consistant. I normally prepare a container of flesh wash that I mix from red and brown along with my other containers of ink. This makes it much easier to go back and touch up flesh tones and have it match areas that you painted earlier.
Especially for washing muscles, I like a striking contrast. You want to avoid staining the existing flesh as much as possible to avoid a dirty look. To avoid this, brush the areas to be washed with water alone. If you want even higher contrast you can just brush the water onto the areas with cracks and crevices, leaving the elevated portions of the detail dry.
If there is wet paint and dry paint next to each other and you introduce ink, or to some degree paint, the pigment will flow where there is water until the wet crack is full. It is almost as if the surface tension of the water keeps the ink in the wet region like a dam until the dam overflows. As an experiment, try painting some wash onto a fleshy area that is not dampened first and then compare it with another area that has been dampened. Even if the area is just barely damp it will keep the pigment from saturating and staining the flesh tone very dark, as the acrylic paint has already been saturated by the water. It will still pick up some pigment, but the wash will tend to run off without coloring the base coat much.
You may find this helpful when doing the face as well if you want high contrast and really want to avoid the dirty look that washes can leave on flesh tones. After washing, drybrush the flesh with flesh tone lightened by either white or a pearlescent white. The latter will give the skin a sort of glow to it. The pearlescent should be used VERY sparingly, and usually only for the very last drybrush touches, using white added to the flesh tone up untill then.