Apply Primer to Your Miniature
Devoting an entire page to applying primer to miniatures may seem like overkill. Here's why this may be the most important step in the entire painting process.
Why Prime Your Miniatures Before Painting?
Primer serves two main purposes:
- It makes paint stick to the miniature
- It provides an undertone for the color applied
Primer Makes Acrylic Paint Stick
Acrylic paint doesn't adhere very well when applied directly to metal, resin, or plastic, no matter how well you clean your miniature.
Primer bonds well to metal and plastic. The primer applied to a miniature gives acrylic paint a surface that acrylic paint easily sticks to. This was something I didn't understand well when I first began painting miniatures over 20 years ago, but this has a lot to do with how my painting techniques have evolved since then.
Without primer, acrylic paint can flake or chip off easily. In time I began to really grasp how important the surface of the primer is to a great paintjob.
In the beginning I applied primer pretty thick to help me achieve bright colors (more on that later). What I didn't realize was that I was making two major mistakes:
- I destroyed details of the miniature by filling them in
- I created a smooth primed surface that paint doesn't stick well to
Select your primer color based on the overall color mood you want. Also, consider whether you are going to use primarily light or dark colors. Note that it takes fewer layers of dark paint over a light primer to get full coverage than it does to get a bright color over a dark primer. For this reason, I typically prime with white.
Without a light undercoat, the light areas of the treeman miniature above would have looked drab. I prefer to prime miniatures with white because I tend to like more vibrant colors.
Less Primer Means Sharper Details
Applied excessively, primer fills in fine lines and rounds the edges of detailed areas. The best miniatures often have the finest detail. It's a shame to degrade the work of a skilled sculptor and the best casting techniques by blanketing over it with a thick coat of primer.
Now when I prime, not only do I apply far less primer, but I use very thin coats. This helps you to control how much primer you apply. Thin coats also give a slightly rough surface to the miniature, which paint sticks to better than a shiny surface.
So, how do you know when you have applied enough primer? A well cleaned metal mini will typically have a shiny surface, as will some made of plastic or resin. Spray primer in a well-lit area so you can easily see the light reflecting off the portion of the mini you're priming.
It also helps to use a primer that is a different color than the miniature you're painting. Many resin miniatures are either cast in gray material or are primed gray. White or black primer will help you to determine when you have applied enough.
You'll always want to use a flat, or "matte" primer, meaning it's nonreflective. Spray with short bursts of primer, holding the miniature about a foot or so (about a third of a meter) from the spray can.
Apply just enough primer so that it eliminates any shininess when dry.
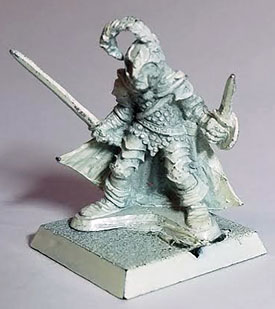
The amount of primer on this old miniature was about right. You want to spray enough primer on the mini for the paint to stick, but not enough so that it begins to fill in the cracks and fine details.
On this mini, you can see a tiny bit of shine on the white paint in places. When I was first starting out, I'd use whatever white paint I had around the house, in this case a gloss white. Paint doesn't adhere well to glossy surfaces. Primer that is flat, or "matte" gives the paint a better surface to which to stick.
Thin Coats Prevent a Plastic-like Surface
One point I didn't understand when I began painting minis is that thick priming results in a smooth, plastic-like surface. Why should you care? Simple. Paint sticks better to a surface that's not perfectly smooth.
Think of it this way. If you're standing on an inclined ramp, will you slide more easily if the ramp is smooth or if it's covered in a sandpaper surface? Naturally, you don't slide as easily on a rougher surface.
Acrylic paint needs something to stick to, not only so it won't flake or chip off, but also so the paint can't move around as much as it dries. This is very important to avoid color rings that can appear when you wash or blend.
Primer Provides an Undertone for the Color You Paint Over It
If you have ever painted a bright color over a dark primed miniature, you have experienced how difficult it is to get brilliant colors without priming with white or a very light color.
Also, you may find that it takes many coats of a dark color to obtain full coverage over a white or very light primer. The more coats that you apply, the more details get filled in.
Some recommend priming with a gray color as a compromise between white and black. In my experience, this isn't ideal. You can usually never get truly vibrant colors over gray, and even less so over black. Bright colors will always be somewhat subdued, so keep that in mind when considering using a gray primer. If you want less saturated colors, you may want to paint over gray or black primer. It really depends what look or color mood you want to achieve.
Assuming that you paint with thinned acrylic paint (which you should) you will need to paint several coats over gray primer to get either bright or very dark colors. This often covers over details unless you're careful to apply very thin layers of paint and carefully prevent accumulation. Much more importantly when using acrylics, when painting over gray it's difficult to get the full dynamic range of bright and dark colors. Your pieces may end up looking drab.
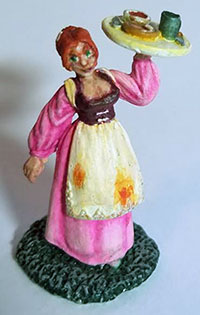
It would have taken more layers of paint for the pink of this serving wench's dress and the white of her apron if I hadn't used a white primer.
What Color Do I Prime With?
I almost always prime with white. Why? I like vibrant colors.
Back in the 1990s I tried for the Citadel/Games Workshop look, which at the time meant strong contrast and bright colors, bordering on the garish. I didn't do much miniature painting for several years (Curse you, World of Warcraft!). In the meantime, gaudy circus colors thankfully fell out of fashion.
Realistic blends are now popular. Lifelike miniatures win awards. However, no matter your style, you still need to be able to obtain a full spectrum of color, from thinly applied brights to earth tones.
OK, you may think, that's great for bright colors, but what about dark ones? Here's a key point. Light colors are far less opaque than darker ones. Dark paint covers over white primer far easier (and with fewer coats) than painting light colors over darker primer.
Priming Plastic and Resin Miniatures
Standard primer doesn't always adhere well to plastic and resin miniatures. In recent years, Krylon developed a primer dedicated to spray painting plastic.
Click the "Shop now" link on the spray can image below to learn more.
Featured Product
Specially formulated primers will adhere well to plastic. Try using this if you find that other primers aren't sticking well.
Advanced Technique - Blackwash
Some miniature painters use a technique called blackwash or preshading to prime their miniatures. This technique involves priming with black primer, then drybrushing highlights with white. Using blackwashing to prime this way, you can achieve both dark shadows and bright highlights. Click on the link below to learn more about blackwashing.
What Kind of Primer Should You Use?
If you want to paint on the cheap, head to your nearest hardware store and pick up a can of white automotive primer. I often use Krylon primer, but any major brand will probably work fine.
Avoid the really cheap stuff. I've found the nozzle often clogs up and you can get uneven coating of paint, especially when priming when it's colder than room temperature where you prime. I've also found that some of the cheap primer I've used is too thin, and easily flows into cracks, filling in details.
I have used a lot of generic primer, especially for larger figures or terrain, but I find that using one that is put out by a miniatures or scale model company like Testors (see the product image with "Shop now" below it) is your safest bet. It will often spray in a finer mist, so you're less likely to have issues with spraying primer too thick, which could fill in details of your miniature.
Featured Product
I generally prime with white, since it's easier to cover white with a dark paint than to cover a dark primer with a white color.
Paint With Primer Where It's Warm
Avoid spraying primer in conditions much cooler than room temperature. If you apply spray paint in the cold, you may find that the paint applies unevenly. You won't like the results. For those of us who live in areas where it gets pretty cold in the winter, I've found that spray-painting in a garage, even if not actually heated, often gives better results than doing so out in the cold.
Control Overspray
If you spray primer in a garage or other area where you don't want to get primer all over the place, you want to control overspray. You can do this with a simple cardboard box. Cut away one side and place the miniature inside and then spray the miniature inside.
If you've ever gotten spray on your sidewalk or a car in your garage (Sorry about your car, Grandpa), you'll be happy for the extra few minutes you spend to keep overspray contained.
Mold Lines
Often, only after applying a coat or two of primer will you see mold lines or flash appear which you had overlooked. Remove mold lines or flash as detailed in the page linked to below, then apply a thin coat of primer.
worth a few dollars/Pounds/Euros?
I don't sell anything on this site, and I provide all information free of charge, so if this site has helped you, please consider donating to help support adding more content to this site. Just click on the Tip Jar image above.
If everyone pitches in just a few dollars/Pounds/Euros, I can add videos and more tutorials to serve you even better.