Cardstock Paper Roleplaying Miniatures
Unless you have a VERY understanding wife, buying a lot of miniatures may be a financial no-go.
Even if you have the cash, you may not have the time to paint miniatures for use in your weekly roleplaying game.
Despair not! My wife loves buying me minis and I have no life, so I make the time to paint often. While I can't buy and paint your miniatures for you, if you have a color printer, here's the next best thing.
First, download the PDF fold-up for the mechanical spider guy miniature by clicking on the link below.
| Download PDF paper foldup |
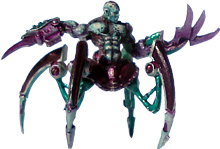
You can have this miniature for free... well, almost.
Making Durable Cardstock Miniatures
As you might guess, one thing you'll want to pick up is some cardstock to use in your printer.
You can use paper, but the fold-up miniatures you make won't be as durable or sturdy.
Open the PDF file in Adobe Acrobat Reader and print. Cut out the fold-up.
Fold the tabs down.
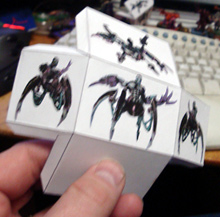
Step 1: Print out the miniature and cut it out.
Glue the Tabs
Use ordinary white glue to adhere the tabs together, forming a box. Don't glue down the bottom, leaving a lid.
Paper miniatures have two downsides, both of which I'll show you how to overcome:
- They have no weight to them
- They feel flimsy and insubstantial
Add weight buy taping a few washers or coins to the bottom of the paper miniature.

Step 2: Fold, and Glue the Tabs Together.
Filling in Paper Miniature to Make it Feel More Solid
I found paper miniatures too easily crushed. I found something that works great to fill in paper miniatures, making them difficult to crush. Better yet, I fill them with what's basically "Nerf in a can!" I'm not saying you're OK bouncing your miniatures off your players heads... but they probably have it coming.
I found some great stuff to fill my paper miniatures. In fact that's it's name. Dow makes a can full of foam that's perfect for this purpose. It's an epoxy foam.
It's used to fill in cracks in your home to keep drafts out. It feels like the inside of a Nerf football when it dries.
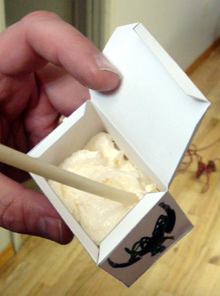
Step 3: Fill the box with Great Stuff foaming insulation.
Leave Room for Expansion
Great Stuff works well for filling in cracks because after you fill the gaps, it continues to expand.
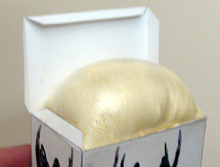
Pull the bottom "lid" out of the way and fill 'er up. You won't want to fill it all the way to the top or as it sets up, it will flow over the top and make a mess.
Epoxy foam is messy if you get it on your hands, so you if you have some latex gloves, wear them.
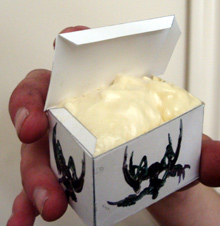
10 minutes after filling
Let the foam dry for a couple of hours. You'll be able to tell that the foam is completely dry when you cut into the middle of the foam with a knife and it comes out clean. If it comes out gooey, let it dry some more.
With a sharp knife, carve away the excess foam so the bottom lid can close all the way.
Glue down the bottom lid and you're good to go. If you print up a half dozen of these paper miniatures, you're ready to terrorize your Roleplaying victims on the cheap.
Come back to www.how-to-paint-miniatures.com from time to time. I'll make paper miniatures out of many of my miniatures for your enjoyment.
45 minutes after filling